p Picks and Pecks: Chinese New Year
Showing posts with label Chinese New Year. Show all posts

Saturday, June 22, 2013

recipe: hou si

Just when I thought that I was well aware of the Chinese New Year menu - I learned about a new dish this year. And as luck would have it, I heard about it from multiple sources so I was able to take the best of what I heard and combined it.

It was a bit hard finding a recipe for this, but I think this dish is quite simply called hou si, which is just the name of the dried oysters in the center of this dish but in reality it is so much more. The ingredients themselves are quite basic - the quantities listed below make about 60 hou si by my count, and they freeze well and can be refried or heated up before serving.

Ingredients A:


  • 500g ground pork
  • 20 dried shitake mushrooms, soaked to soften (~ 2 1//2 cups)
  • 1 carrot, diced (1 3/4 cups)
  • 5 stalks spring onion, sliced thinly
  • 40 water chestnuts, peeled and diced (~ 3 cups)
  • 2 tbsp rice wine
  • 2 tbsp soy sauce
  • 1 tsp pepper
  • 2 tsp salt


Ingredients B:

  • self-raising flour, sifted (for dusting)
  • 60 dried oysters (~ 2 cups)
  • caul fat - usually sold at butcher shops at wet markets

The most unusual thing in this recipe is the caul fat - which is sold in a bundle that looks like a wet t-shirt. You'll need to rinse out the caul fat, and pick out any bits of bone or flesh that are clinging to it. 


Combine everything in ingredients A together until evenly distributed - this is the stuffing of the hou si. 

Spread out a corner of the caul fat thinly so that it is completely flat. Put a tablespoonful of the stuffing on the caul fat...

... add a dried oyster...

... and cover with just under another tablespoon of stuffing. Cut out the fat so that there is a 1.5 inch border on the sides...

... and fold sides inwards to make a compact package - it needs to be tight, so the fat doesn't open when the stuffing expands during frying. 

Arrange the hou si in a neat pile. You'll need a flat wide space to flour the hou si before frying. 

Heat up some vegetable oil in a deep pan for frying - you will need at least 2 inches of oil.

While the oil is heating up, pour out some sifted flour and lightly toss each hou si so it is covered in a thin coating of flour. This helps absorb any moisture on the  surface of the hou si, which stops the oil from splattering.

Once the oil is hot enough, a wooden chopstick pressed against the bottom of the pan should cause bubbles to form. Gently drop each hou si into the oil, being careful to keep some space in between each hou si.

As the hou si fry, the oil will darken from the fried flour - this is normal. When the hou si is a golden brown, remove from the oil and let drain on a paper towel before serving. If freezing, let them cool completely before storing.


Saturday, April 27, 2013

recipe: chap chye

Caught up in all the busy-ness of Chinese New Year, we almost forgot to make chap chye - a vegetarian dish that is typically served on the first day of the New Year, when some avoid eating meat. (Clearly this wasn't the case for me!). 

But chap chye is always a good, light antidote after all the heavy eating during the holiday season. Despite it being vegetarian, it is very substantial and I really do not miss the protein in this one pot dish.


This time, we kept the main ingredients very simple:

  • small white cabbage
  • wood-ear fungus
  • dried lily bulbs - rinsed and tied with a knot in the middle
  • dried bean curd sheets or fu chok - rinsed and torn into small pieces
  • tang hoon or glass noodles

Additional ingredients are half a clove of garlic and some fermented bean curd, which was stir-fried in hot oil before the lily bulbs, cabbage and fungus were added. While the vegetables cooked and softened, the liquid from the cabbage and fungus will seep out, creating a stock. Once that happens, add in the glass noodles and the dried bean curd, which need the moisture from the veggies to soften. Depending on the amount of water which is released, you might need to add some hot water if the noodles do not get softened enough.


Cooking time for this dish took only about 20 minutes - ideal for a light lunch. 

Other substitutions/additional ingredients include:
  • chinese/napa cabbage in place of white cabbage
  • dried shitake mushrooms - pre-soaked, with stems removed
  • carrots
  • black moss

Saturday, April 13, 2013

recipe: chai buey (spicy/sour mustard greens with roast pork)

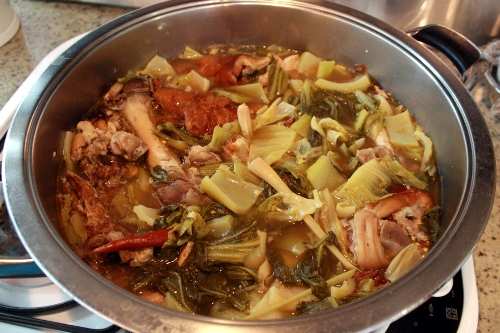
Chap chye is really a one-pot meal. It has meat and vegetables all simmered together; its spicy and sour notes make your mouth water.

Usually chap chye is made with leftovers in the kitchen. Some grandmothers end up chucking everything but the kitchen sink into it - some add fish balls, even chicken nuggets!

But if I was to serve it to company, I would keep the dish really clean. You don't want too many flavors muddying your stew, or little bits of meat cloudying your stock. What I've used this time around is leftover roast port - you could buy fresh meat if you wanted, like roast pork shoulder or even roast duck. 


In addition to the roast pork, the other main ingredient is the mustard green. This is a thick, fleshy vegetable, not very leafy and with a bitter stem.


The mustard greens cook down and shrink quite a bit, so I use not just one head of mustard green, but three - almost an entire sink-full!


Before the dish proper is prepared,  I first blanch the pork bones in boiling water to remove most of the salt which is rubbed under the meat before it is put on the spit.


The water will turn murky, and should be thrown out, otherwise the salt and five-spice powder will overwhelm the flavor of the chap chye. 


The seasonings for the chap chye are very basic:

  • assam (you can use either the dried assam slices, or the paste - as shown here)
  • dried and fresh chillis to taste
  • lemongrass


First the pork bones are put into a fresh water and brought to a boil. Then the spices are all added at the same time and the meat is left to simmer for at least 30 minutes or so the flesh becomes tender.


Once the spicy, sour flavours have infused into the stock, the mustard greens are cut into large chunks and added into the soup.


The chap chye is done once the stalks have softened and have lost that bright green hue. Serve with lots of white rice!

Monday, March 11, 2013

roadtrip: 拜天公 (bai tian gong - 9th day of chinese new year)

No recipes or review for this post - time for a roadtrip for Chinese New Year! The second weekend of CNY this year coincided with bai tian gong - when many Chinese pray to the Jade Emperor - so I went back to my parents' hometown to watch my relatives prepare the traditional food offerings. Prayers only start on the night of the ninth day of CNY, but preparations began before sunrise!

I rolled out of bed at 5am, and was still groggy when I went to the kitchen where they were already busy preparing ang ku koe (or red tortoise cake - say the powers that be on Wikipedia). Commonly found in the shape of a tortoise shell, the molds also make peach shapes as well as long ingot shapes. As you can see, we made both the red mung bean-filled ang ku, as well as the dark brown/black ang ku - dyed with the juice from sweet potato stems) which were filled with toasted black sesame paste, ground with sugar. 


Though it seemed simple enough to churn these out, they required a deft hand to remove the ang ku from the mold without damaging the tortoise shell design. Most important was the mold itself - my aunt has had hers for years and the dark wood is now impregnated with oil from years of ang ku making - good, distinctly carved molds are hard to find these days! These hardwood ones made the best impression on us (pun intended).

Once the ang ku were steamed and brushed with oil, we began work on the mi gu (米龟) - a plain steamed bun. Usually, mi gu are made in the shape of tortoises, like the ang ku but my aunts seem to prefer these dog-bone shapes - but you can still see a few tortoises in the bottom right picture. Made in a similar way to regular bread dough, the mi gu dough has to be kneaded and left to rise twice before the skin is brushed with pink coloring for the auspicious occasion.

While the mi gu were left out in the sun for the final rising, we started on the gai tan gao  or 鸡蛋糕 which literally translates to "chicken egg cake". Prepared with the simplest of ratios - equal volumes of eggs, sugar and flour - the recipe sounds similar to that of a pound cake (omitting the butter), but it takes a lot of muscle! The eggs and sugar are beaten together - I say beaten, and not whisked because we had to use an implement which more closely resembled a medieval torture device (top left) to beat the (40!) eggs into submission. When it was a thick, pale yellow, we added the flour and steamed the cakes in baskets - first segmenting them into halves/quarters with a chopstick dipped in oil to make them "smile" or puff open into quarter segments when they were cooked.

Last came the bee koe or glutinous rice. This started with sugar being dissolved in thick santan or coconut milk - constant stirring in the wok required! Once the mixture was smooth, glutinous rice was added (which had been soaked overnight) together with pandan (screwpine) leaves and cooked till the rice absorbed the santan. Constant motion is required as the mixture is apt to burn as it gets thicker - before it is scooped onto plates and smoothed down. Dates and a red hard-boiled egg are normally placed on the rice prior to prayers.

Monday, February 11, 2013

recipe: gravlax


Chinese New Year was just around the corner, when I decided to try this little experiment with salmon. What does gravlax have to do with Chinese New Year you might ask? Well at this time of the year, restaurants tend to sell yee sang at exorbitant prices for measly pieces of fish, so I thought - why not try to make some at home?


This really quick recipe cold-cures your salmon in a day, if you're using just a small piece. Best part is that it requires next-to-no work!

All you need is a piece of really fresh salmon from the market. Some recipes ask that you use sushi-grade salmon from your grocery store, but I got mine from the wet market. I got the fishmonger to fillet the tail into two halves, to make working with easier.

There are so few ingredients that I can show them all in one picture! All I needed were equal amounts of sugar (came sugar is shown here) and salt (I used rock salt here, as I was afraid the fish might get too salty) and some dill.

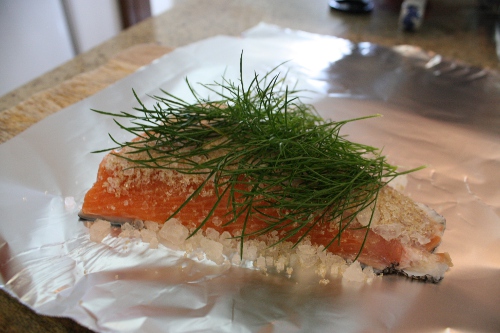
I put the first half of the salmon on a piece of aluminum foil, skin-side down. Running my fingers along the flesh, I made sure there were no bones - any that I could feel were extracted with a pair of tweezers. I then mixed the salt and sugar and put half the mixture on the first piece of salmon. 

After rubbing the mixture gently into the flesh, I covered the salmon with the dill leaves, which I scrunched between my fingers to release some of the oils.

I repeated the same process with the other half of the fish, and placed both fillets on top of each other. Then I wrapped the foil tightly around the fish, pinching and sealing the ends.

I wrapped that package in cling film before putting it in the fridge. All it needed was a flip after 12 hours or so. 

Once the 24 hours are over, remove the package and discard any water that might have collected at the bottom of the pan. I rinsed the fillets quickly under running water to remove any salt or sugar granules that might have adhered to the surface.

The salmon retained the oily texture you would get from smoked salmon, since some of the liquid had been extracted by the salt-sugar mixture - this meant that it did not really resemble sashimi-type salmon. Quite importantly, it did not have a fishy odor despite curing for a day - and the fragrance of the dill served to accentuate the fresh note.

After patting the fillets dry, slice them thinly across the grain for use in sandwiches. You can also mix any small offcuts into leftover cream cheese for a quick and easy spread to use on bagels! 

Note: a week later, I tried making blinis to serve with the salmon.

Thursday, January 24, 2013

recipe: nian gao with coconut

It is getting harder and harder to find homemade nian gao this year, since this time consuming recipe is getting shelved in favor of the sticky treat being poured into plastic containers, instead of being steamed in aromatic banana leaves. 

Since it's still two weeks before Chinese New Year, the nian gao at the market is still fresh and soft, so when you buy it, they put it on a paper plate or some study cardboard to prevent it from collapsing. One of the easiest things to do with nian gao when its still soft like this is to roll it in coconut as a sweet snack.

Monday, April 16, 2012

recipe: fried nian gao (take 2)

More sticky goodness! Here is a second try at making nian gao - slightly different from my first try. This time I did not have any sweet potato, so the brown nian gao stands out a lot more from the taro.

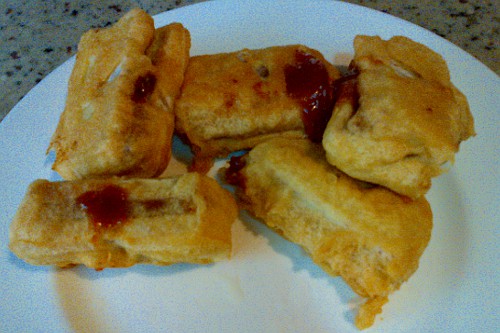
I thought that this attempt looked a lot neater as I tried to keep the nian gao into regular, rectangular shapes, slightly larger than the nian gao itself so that there is less risk of the melting nian gao overflowing (you can still see some seepage though!)

Anyway, any extra/leftover taro can always be fried in batter alone, or sliced thinner and made into taro crisps!

Sunday, March 13, 2011

recipes: fried nian gao

Fried nian gao is usually a staple during Chinese New Year. Typically the nian gao is sandwiched between two pieces of taro, but I had some leftover purple sweet potatoes so I thought I would tweak the recipe a little.